(TD) 1.8 Add the D Flip-Flop Propagation Delay |

|

|
|
(TD) 1.8 Add the D Flip-Flop Propagation Delay |
|
|
(TD) 1.8 Add the D Flip-Flop Propagation Delay |
|
|
|
(TD) 1.8 Add the D Flip-Flop Propagation Delay |
|
|
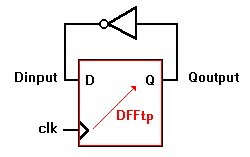
Add the delay that represents the propagation time from the positive edge of the clock to the Qoutput of the D flip-flop. First we will add a blank delay between the edges and then we will edit it so that the delay is named "DFFtp" and has a propagation delay of 5-18ns.
Add a blank graphical delay:
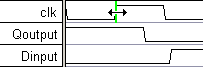
•Press the Delay button so that right clicks will add delays. |
|
•Left click on the first rising edge of the clock to select it. This edge will be the first or driving edge of the delay. |
|
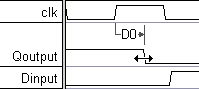
•Right-click on the first falling edge of the Qoutput signal, to add the delay between the two edges. Since the delay is pointing to this edge, this will be the edge that moves in response to formula values entered into the delay |
|
•Notice that D0 was also added to the Parameter window. |

Watch the delay as you change the min value:
When delays are added, they are blank and do not enforce any timing restraints. Notice that the delay is drawn with gray colored lines: this indicates that the delay is not forcing either the min or max edge of the Qoutput signal. Now edit the delay's parameters.
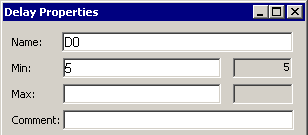
•Double-click on D0 in either the Diagram or Parameter window to open the Delay Properties dialog. For simplicity, we will refer to this dialog as Parameter Properties, even though the name at the top may say Delay Properties or Setup Properties depending on the type of parameter being edited. |
•Adjust the position of the Parameter Properties dialog so that you can see the parameter in the Diagram window and at least part of the parameter in the Parameter window. •Type 5 into the min edit box and press the TAB key to move to the max edit box (leave max blank for now). This enters 5 display time units (5ns for this timing diagram). |
|
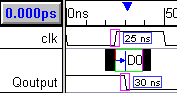
Several things happened when you pressed the TAB key:
•The falling edge of Qoutput was moved so that it is 5ns from the clock edge. If you hover over the delay with the mouse, blue boxes with the edge times will appear so that you can check the edge times. |
|
•Also note that the delay changed from a gray color to a blue color. Delays are color-coded to indicate which delays are forcing the min and max edges of a transition. This type of critical path display is necessary in diagrams where multiple delays drive a single signal transition. The colors are: Gray = none, Blue = Min only, Green = Max only, Black = both min and max. After this tutorial you may want to experiment with the multdely.btim file (in the Examples directory) to see the effects of multiple delays on a single transition and critical path color coding. |
•Finally, the parameter information also was updated in the Parameter Window. |
|
Edit the rest of the delay:
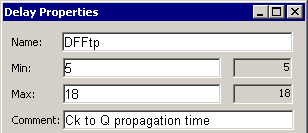
•Type DFFtp in the Name box. •Type 18 in the Max box. •In the Comment box, enter Ck to Q propagation time. •Close the dialog when you are done. |
|
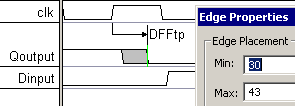
•Notice that the DFFtp delay is black which indicates that it is forcing both edges of Qoutput. •Also notice the falling edge of Qoutput now has a gray uncertainty region. Double click on the edge to verify that the edges of the region are 5ns and 18ns from the clock edge (13ns of uncertainty). |
|
Tip: The Parameter Properties dialog is modeless (other operations can be performed while the dialog is open) and interactive (any changes in the dialog fields are reflected in the diagram after you move out of that field). When the Parameter Properties dialog is open you can edit a different parameter by double-clicking in the Diagram or Parameter window on the parameter you want to change. If you double-click in the Diagram window, that instance of the parameter will be edited (the Change All Instances checkbox will NOT be checked). If you double click in the Parameter window, ALL instances of the parameter will be edited (the Change All Instances checkbox will be checked).