(Sim) 2.2 Create a project and extract the ports |

|

|
|
(Sim) 2.2 Create a project and extract the ports |
|
|
(Sim) 2.2 Create a project and extract the ports |
|
|
|
(Sim) 2.2 Create a project and extract the ports |
|
|
Create a project in WaveFormer Pro to hold the model under test. This will give WaveFormer access to the port information of the model.
In WaveFormer Pro create a new Project:
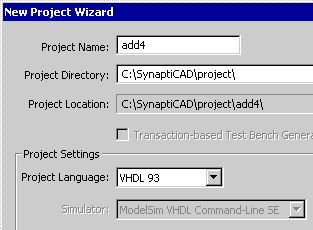
•Select the Project > New Project menu to open the New Project Wizard dialog. •Name the project add4. This will be both the name of the project and the directory name where the project is stored. •Set the Project Language drop-down to VHDL 93. This tells WaveFormer’s parser what language the MUT (Model Under Test) is written in. •Close the dialog to create the project. |
|
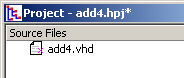
Copy the Model Under Test File into the project:
Next we will copy the file containing the VHDL model under test to the project directory and add the source file to the project file.
•Right click on the surface of the Project window and choose Copy New Source Files from the context menu. This will open a file dialog. |
|
•In the above picture, the copy command copies the files to the project directory. The add command will leave the file in place and just point to the file. For this tutorial we will copy the files. |
•In the file dialog, browse to the directory C:\SynaptiCAD\Examples\ and select the add4.vhd file. Then press ok to close the dialog. The file should appear in the Project window. |
|
Extract the port information from the Model Under Test:
•Press the Extract MUT Ports button on the toolbar. |
|
•Notice that the ports of the fulladder model have been inserted into the Stimulus and Results diagram. If no signals appear, make sure that language drop-down on the toolbar is set to VHDL. •Select the File>Save Timing Diagram As menu to open a file dialog. Save the diagram and name it add4test.btim. |
|
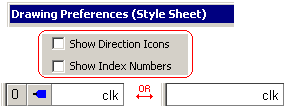
(Optional) Hide the Direction and Index Columns in the Label window:
•By default the Direction and Index columns are shown, but we have hidden them in this tutorial to make smaller images. Choose Options > Drawing Preferences to open the dialog. Then uncheck Show Direction Icons and Show Index. |
|