9.1 Performing a Signal Compare |

|

|
|
9.1 Performing a Signal Compare |
|
|
9.1 Performing a Signal Compare |
|
|
|
9.1 Performing a Signal Compare |
|
|
When comparing two waveforms, the signal names must match and one of the signals must be marked as compare in its Signal Properties dialog. When comparing two entire files, these options will be set automatically. However, if you are comparing individual signals, you will need to set these by hand. Comparing files also be done automatically using the batch mode feature discussed in Section 11.5 Batch Mode.
Comparing whole timing diagrams or simulation files:
•Load the first timing diagram (or other file) with the File > Open Timing Diagram... menu. •Then load the second timing diagram using the File > Compare Timing Diagram... menu. This second file must be a timing diagram file with a btim extension, so you may need to first load this file normally and save it as a btim file prior to performing the comparison. Closing this dialog (1) loads the second set of signals into the first timing diagram, (2) sets their signal type to compare, and (3) performs the first compare between any two signals that have matching names. |
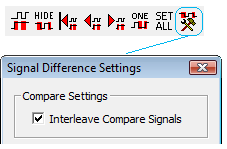
•Normally the compare signals are interleaved, that is arranged so that they appear directly below the original signal. However, if you uncheck Interleave Compare Signals setting in the Signal Difference Settings dialog, the compare signals will be displayed as a group below all of the original signals. Press the Signals Difference Settings button to open the dialog to change this option. |
|
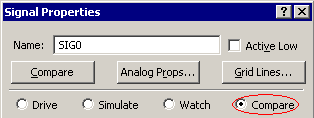
Setting up a compare between two signals:
•Create two signals with the same name. •Double click on the signal name that will display the red compare regions to open the Signal Properties dialog, then select the compare radio button. This will perform the first compare and also expose additional compare settings. |
|
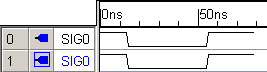
The Compare Display:
•If there are no differences within the tolerance range, then the compare signal will have a blue name and the waveform will be all black. The direction icon will also have a box around it to indicate that it is a compare signal. |
|
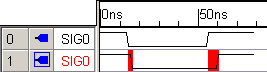
•If there are differences, then the compare signal will have a red name and the waveform will have red highlighted regions showing the differences. |
|
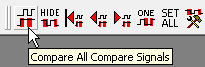
Forcing a comparison:
•The comparison regions are calculated once when either the compare file is loaded or when a signal changes type to Compare. To force an additional compare, press the Compare All Compare Signals button on the main button bar. |
|
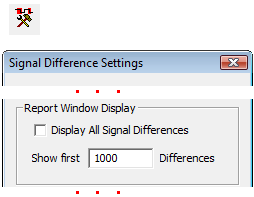
Control the number of differences displayed:
To avoid slowdowns in the comparison calculation when there are an unexpected number of differences, the compare feature by default will only show the first 1000 differences in the Differences tab window. To change this default:
•Press the Signal Difference Settings button to open the dialog. •Either type in the number of differences to display or check the Display All Signal Differences box. |
|