(TBench) 2.5 Draw Expected Waveform and Wait for the Assertion |

|

|
|
(TBench) 2.5 Draw Expected Waveform and Wait for the Assertion |
|
|
(TBench) 2.5 Draw Expected Waveform and Wait for the Assertion |
|
|
|
(TBench) 2.5 Draw Expected Waveform and Wait for the Assertion |
|
|
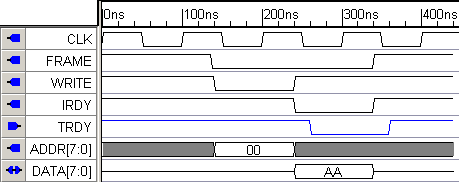
In this step we will sketch an expected TRDY waveform that the model under test should produce when it successfully completes the write cycle. We also want the test bench to pause until TRDY goes low before driving the rest of the stimulus. There are two different ways to create the pause.The first method uses a Sample which will pause until either the assertion happens or the sample timeouts. The other method uses the Sensitive Edge feature and will wait indefinitely for TRDY to assert. Both methods are explained below.
Draw the Expected Waveform for the TRDY signal
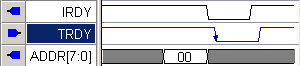
•First draw the expected TRDY waveform shown below. Notice that the waveform is blue because it is an input to the diagram, so the data shown is predicted data, not data to be driven. The direction of the signal was imported during the extract ports from mut step and is shown by the blue icon pointing to the right. |
Method 1) Wait with a Timeout Using a Sample
This first method uses a graphical sample to wait on an incoming edge. The sample can also specify a timeout so the test bench does not hang-up during an error condition.
•Press the Sample button so that right clicks will add delays. |
|
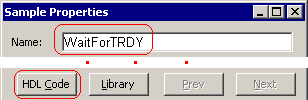
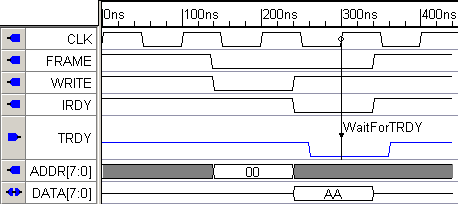
•Left-click on the rising edge of CLK at 300ns to select the edge, then right-click on TRDY at 300ns (or slightly later than 300 ns). This will add a sample to the diagram. •Double-click on the new sample's name to open the Sample Properties dialog. |
|
•Change the name to WaitForTRDY, then click on the HDL Code button in the Sample Properties dialog to open the Code Generation Options dialog. |
|
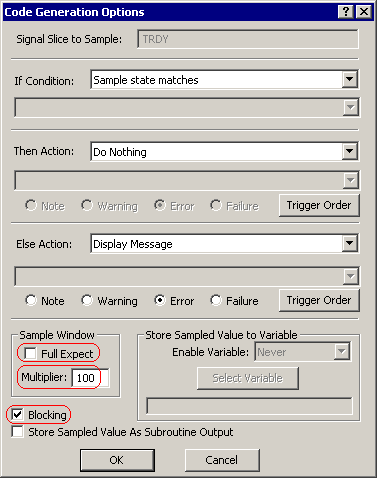
•This dialog controls the code that the Sample Generates. Take a look at each of the controls. •Uncheck the Full Expect check box to indicate TRDY only has to assert at some time during the sample’s execution. •Specify 100 for the Multiplier to make the sample wait for up to 100 cycles of the clock since TRDY is a clocked signal. •Check the Blocking check box so that the sample blocks the transaction until the sample finishes. •Close both dialogs. |
|
•Export the the test bench using the Export > Export Timing Diagram as menu as shown in Section 2.4. •Click into the Report Tab that contains the generated code to select the window. |
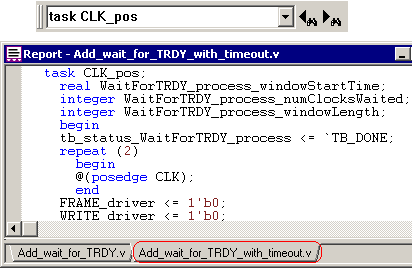
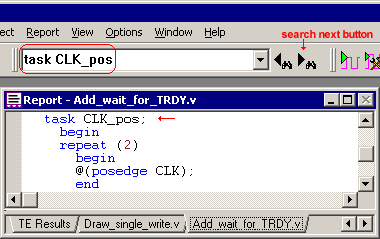
•Then use the Search box on the button bar to locate the CLK_pos sequence (in verilog, search for "task CLK_pos", in VHDL search for "CLK_pos :" ). |
|
•Then search down for "WaitForTRDY" to see the code generated for the sample. |
•This Method demonstrated a way to make the signal wait on a single event with an optional timeout. Click on the sample WaitForTRDY to select it and press the DELETE key to remove the sample so that we can demonstrate a different method in the next section. |
METHOD 2) Wait Indefinitely Using Sensitive Edges
A signal can be set to have sensitive edges, so that the test bench will wait on every falling or rising edge that the model under test generates. Here we will edit TRDY’s properties so that the test bench will wait until TRDY has a falling edge before continuing to supply stimulus to the model under test.
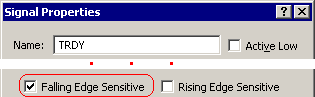
•Double-click on TRDY to open the Signal Properties dialog. •Check the Falling Edge Sensitive check box, and press OK to close the dialog. |
|
•Notice that TRDY now has an arrow drawn on the falling edge, to indicate that it is falling edge sensitive. |
|
•Make sure that the falling edge of TRDY is drawn after the falling edge of IRDY, otherwise the test bench will wait for TRDY to assert before asserting IRDY. •Export the the test bench using the Export > Export Timing Diagram as menu as shown in Section 2.4. •Click into the Report Window Tab that contains the generated code to select the window. |
•Then use the Search box on the button bar to locate the CLK_pos sequence (in verilog, search for "task CLK_pos", in VHDL search for "CLK_pos :" ). •Then search down for "Sensitive" to view the code generated for the sensitive edge. You should see code similar to the following: |
|
VHDL: |
-- Sensitive Falling Edge on signal: TRDY wait until falling_edge(TRDY) or (tb_DgmAborted); |
Verilog: |
// Sensitive Falling Edge on signal: TRDY @(negedge TRDY); |