Step 6: Build the Project and Set the top |

|

|
|
Step 6: Build the Project and Set the top |
|
|
Step 6: Build the Project and Set the top |
|
|
|
Step 6: Build the Project and Set the top |
|
|
Building a project performs the following steps: (1) preparses the design files and fills the Project window with the hierarchical structure of the design, (2) launches a command-line compiler to compile the source code files, and then (3) sets watches on all the signals and variables in the top-level instances. The simulation.log tab window will display information messages generated during the preparse and during the execution of the command-line compiler tools.
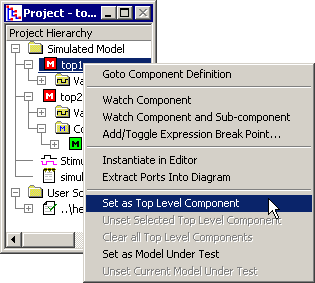
A build will automatically be done each time the simulation is run, but having a separate build button enables you to create the project tree without having to wait for a simulation to run. After the build, you are also able to set the top level instances for the project and/or select additional signals to watch using the project tree context menus.
Three ways to build a project:
•(1) Click the yellow Build button on the simulation button bar, (2) select the Simulate > Build menu, or (3) press the <F7> key. |
|
Set the <<<Top Level Component>>>:
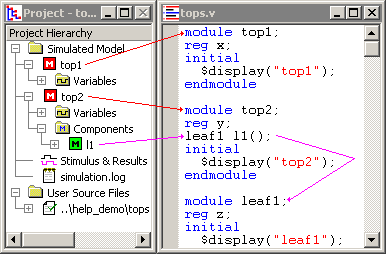
In languages that support multiple top-level instances, BugHunter will find all of of the components that are not instantiated in any other component and list them under the Simulated Model tree without any brackets. If the language only supports one top-level, the program will grab the first that it finds in the files. All top-level instances will be simulated when a simulation snapshot is run. Any component can be specified as top-level, by using the context menu. The --scd_top elaborator command line option duplicates the following GUI functionality (see Section 5.5 Simx: Compiler/Elaborator).
•In this example, after the first build, both top1 and top2 will be listed under Simulated Model, because neither component is instantiated in another component. Both are default top-level modules and will be simulated simultaneously. |
|
•To set one component as the top level, find the component under the Simulated Model or the User Source Files folders and right click and choose the Set as Top Level Instance from the context menu. More than one top level instance can be manually set. |
|
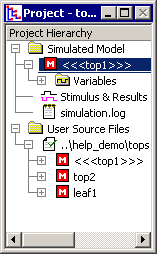
•The manually-set top level instances are displayed with triple brackets <<<>>> around the names. •In this example, only top1 will be simulated. The top2 component will not be simulated because it is not instantiated within top1. •To undo this operation so that the default top-level components are automatically chosen by the tool, right click on the component and choose Unset Selected Top-Level Instance or Clear all Top Level Instances. |
|