Step 2: Setup the Project Simulation Options |

|

|
|
Step 2: Setup the Project Simulation Options |
|
|
Step 2: Setup the Project Simulation Options |
|
|
|
Step 2: Setup the Project Simulation Options |
|
|
The Project Simulation Properties dialog controls how the project is built, and determines the simulator run time options and which simulator to use for projects and diagrams. The default settings for each simulator need to be checked to make sure they match your systems requirements. Also, if you plan to move projects back and forth between different machines and simulators, you may wish to create Configurations for each machine and each simulator. Configuration can also be used to pass different sets of command line options to a simulator. See Section 2.1 Project Simulation Properties for an in-depth discussion of the settings in this dialog.
Open the Project Simulation Dialog and choose the Configuration Template :
•Press the Project Simulation Properties button or choose the Project > Project Simulation Properties menu to open the dialog. |
|
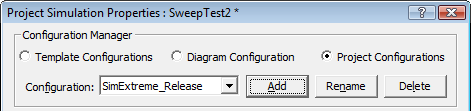
•Most commonly you will be working with the Project Configurations which control how builds are performed in the current project. Project Configurations are stored in the project file. Template Configurations hold the default settings for the configurations that get automatically created inside each new project . The Diagram Configuration controls how diagram simulations are performed (e.g. for simulated signals in a diagram). Template and Diagram Configurations are stored in the program's INI file, not the project file. |
•Select the Configuration for the simulator that you will be using to build the project. You can also create additional configurations to pass different sets of options to a simulator. For example, you might want to pass one set of options to the simulator while debugging your design, then another set of options when you want the simulation to run at maximum speed. See Section 2.1 Project Simulation Properties for an in-depth discussion on creating Configurations. |
Look at the General Tab:
The General tab contains simulation options that are standard across all of the simulators. Here are some settings that are specific to BugHunter's integrated timing diagram editor environment:
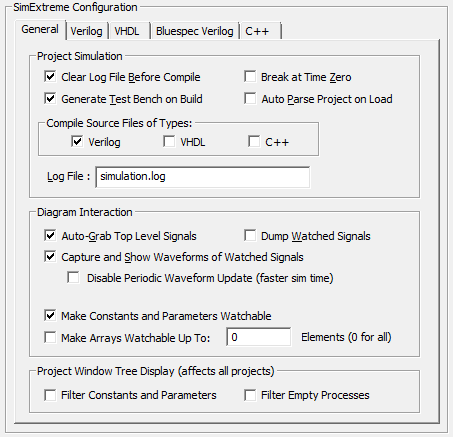
•Auto-Grab Top Level Signals causes signals in the top-level component(s) to be automatically added as Watch signals in the Stimulus and Results diagram whenever the project is rebuilt. •Capture and Show Waveforms of Watched Signals enables the acquisition and display of waveform results from a simulation run. •Compile Source Files of Types section specifies which kind of files to compile. Unless you are working in a mixed-language project, only one language should be checked. These check boxes are particularly useful for a V2V translation project, where you may want to switch back and forth between compiling the original code in one language and the translated code in the other language. |
Look at the Language Tab for each simulation language that you plan to use:
•Pick the Language tab for your simulator. •Simulator Type specifies the simulator. |

•The Simulator Settings button opens the Simulator / Compiler Settings dialog where you can edit the simulator paths. •Include Directories specifies the directories where BugHunter searches for included files. The following is a Windows example (Unix users should use the / slashes): C:\design\project;c:\design\library •The Library Directories box lists the path and directories where the program searches for library files. BugHunter will try to match any undefined components with the names of the files that have one of the file extensions listed in the Lib Extensions edit box. The simulator does not look inside a file unless the undefined component name exactly matches a file name. The simulator does not look at any files unless there are file extensions listed in the Lib Extensions edit box. Note that this works even with compiled code simulators that don't normally support the -y option. The following is a Windows example (Unix users should use the / slashes): C:\design\project;c:\design\library •Compiler, Elaborator, and Simulator option edit boxes allow you to write additional command line options that will be passed to the tool when it is run. Some simulators do not support all three tools types, in which case the associated edit box will be disabled. Source files can be passed to a simulator via the Compiler command-line options (either directly or indirectly via a command file loaded with -f option), which can be useful method of quickly porting an existing command-line based design to a BugHunter project. By default, options should be specified in Simx simulator syntax, regardless of the target simulator (see Section 2.1 Project Simulation Properties in the Language Tabs ). |