(TBench) 3.2 Create a Project |

|

|
|
(TBench) 3.2 Create a Project |
|
|
(TBench) 3.2 Create a Project |
|
|
|
(TBench) 3.2 Create a Project |
|
|
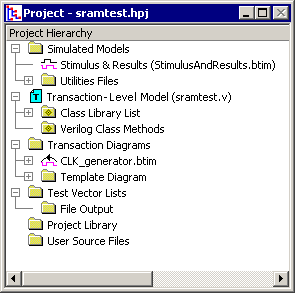
TestBencher Pro uses a project file to represent and to control the generation of a bus-functional model (BFM) component. The information in the project file is displayed in the Project window and context sensitive menus (right-click menus) provide a list of actions that can be performed for the elements in the project tree. Projects are created using New Project Wizard dialog. This dialog helps setup the project directory, the generated language, and the clocking signal for the project.
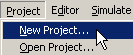
•Select the Project > New Project menu option to launch the New Project Wizard dialog. |
|
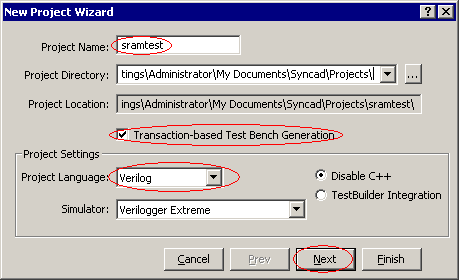
•Enter sramtest in the Project Name edit box. This will be both the name of the project and the subdirectory were project files are located. The subdirectory will be placed underneath the Project Directory path. Unix users need to make sure that you have read/write access to the directory specified in the Project Directory edit box. •Check the Transaction-based Test Bench Generation checkbox. •Use the Project Language box to select the code generation language. This tutorial can be use to generate Verilog, VHDL, and TestBuilder code. Sometimes a file name will be written as filename.<language extension>. This means that the file extension will be different depending on the language used: Verilog *.v, VHDL *.vhd, and TestBuilder *.cpp. •Use the Simulator box to select your simulator. If you are evaluating, use the Verilog and VeriLogger Extreme combination, because the simulator is already set to work with TestBencher Pro. If you do not see your simulator pick one at random, then after the project is created read through the Chapter 1: Section 7: Setup External Simulators in the TestBencher Pro Manual to setup the simulator manually. •Press the Next button to move to the second page of the New Project Wizard. |
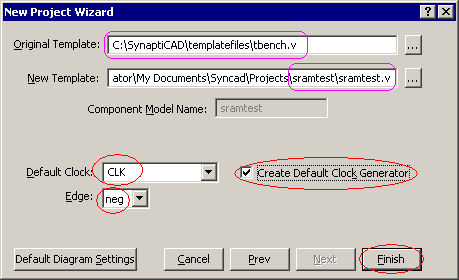
•Note that the name of the New Template is sramtest (the name of the project). TestBencher will use this file to generate the top-level module of the test bench. The Original Template is a file whose contents are copied into the new template file. Typically this file is tbench.v (a default file that ships with the software). •Type CLK into the Default Clock box, and choose neg from the Edge box. Selecting a default clock causes the test bench to be cycle-based; if no clock is specified, the test bench will be event-based. •Check the Create Default Clock Generator box. This will cause TestBencher to create a slave timing diagram called Clk_generator.btim that will drive the default clock signal. •Press the Finish button to close the New Project Wizard, create the project, and populate the Project window. |