6.8 Input Data Dynamically from a File (VHDL) |

|

|

|

|
|
|
6.8 Input Data Dynamically from a File (VHDL) |
|
|
|

|
6.8 Input Data Dynamically from a File (VHDL)
|
6.8 Input Data Dynamically from a File (VHDL) |
|
|
|
|
|
|
6.8 Input Data Dynamically from a File (VHDL) |
|
|
|
|
|
|
||
VHDL test benches can read data from a file during simulation. This is not supported in Verilog, but there is away to mimic this feature by initializing an array during the test bench build process as described in Section 6.9 Initialize Array from File.
The test bench can read data from a file that is in the SynaptiCAD Test Vector Spreadsheet format.TestBencher Pro uses a project-level variable of type File Input to read from the file. The variable is defined by a class with fields (one field per column in the test vector spreadsheet file). This file variable and class definition are automatically created when an input file, with the proper header information, is added to the Project’s Test Vector List - File Input folder.
1) Create a SynaptiCAD Test Vector Spreadsheet File that will be used to make a Class:
Step 1 of Section 6.7 Output Data to a File, describes the first two rows of the Test Vector Spreadsheet file and how to make the file. For an input file, each additional row is a list of all of the signal states in tab-separated columns. Each time TestBencher reads from the file, it will read the next line in the file.
[Vectors] Radix=hex Addr Data[7:0](bin) A4 10110011 54 11011010 .... |
Note: Test vector spreadsheet files can also be imported by WaveFormer and TestBencher, so test vector files can be edited as timing diagrams inside the tool and saved in their modified form. They can also be edited using all major spreadsheet programs like Excel.
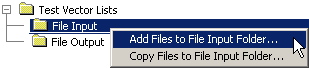
2) Add Test Vector File to project to Automatically create file class and variable:
When a file is added to the project’s Test Vector List - File Input folder, TestBencher will automatically parse the file and create a Class definition with a field for each column of the file. TestBencher also instantiates the class as a variable in the project. The file variable can be accessed anywhere in the project.
|
|
|
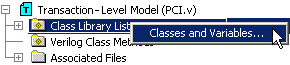
Next investigate the file class and variable that was created:
|
|
|
|

|

|

How To Access a File Variable:
Once a file variable is created at the project level, it can be accessed in any of the project's timing diagrams. Use the @filevariablename.fieldname to read or write to that field. This code can be entered anywhere a variable can be used, such as in a waveform state (Section 2.4 Waveform States and Conditions), samples (Section 3.2 Sample Checking and Actions), parameters (Chapter 4: Transaction Delays, Setups, and Holds), and in markers (Section 5.6 HDL Code Markers).
If an input file variable is accessed within a timing diagram transactor, one line will be read from the file each time the transactor begins a transaction. If the file variable is referenced again in the same transaction, the values will come from the original read of the file. The next time a transactor is called that references the file variable, the next line will be read from the file.
For output files, a line of data is written at the end of any transaction that references the file variable.